How to Install a Sticky Tile Backsplash

As we did in our last camper, we installed a sticky tile backsplash in the kitchen area. This picture shows the sticky tile in our previous camper. Click HERE to see our first camper update.
The faux subway tile we used in our new/used camper is so much easier to clean and lightens up the kitchen area. We just love the result!
Installing sticky tile is a little harder than all the videos make it look but I finally got it done. I think it was a little harder because I only had one workable arm. My other arm was in a splint due to elbow bursitis as a result of hitting myself with a crowbar during our deck railing project. ?
Step 1: Measure and Calculate
Measure your wall area and determine the square footage you will need. Add at least 10% to compensate for waste. My calculations were almost perfect. I had one packet left. We purchased our sticky tile from Home Depot.
Step 2: Prepare the Surface
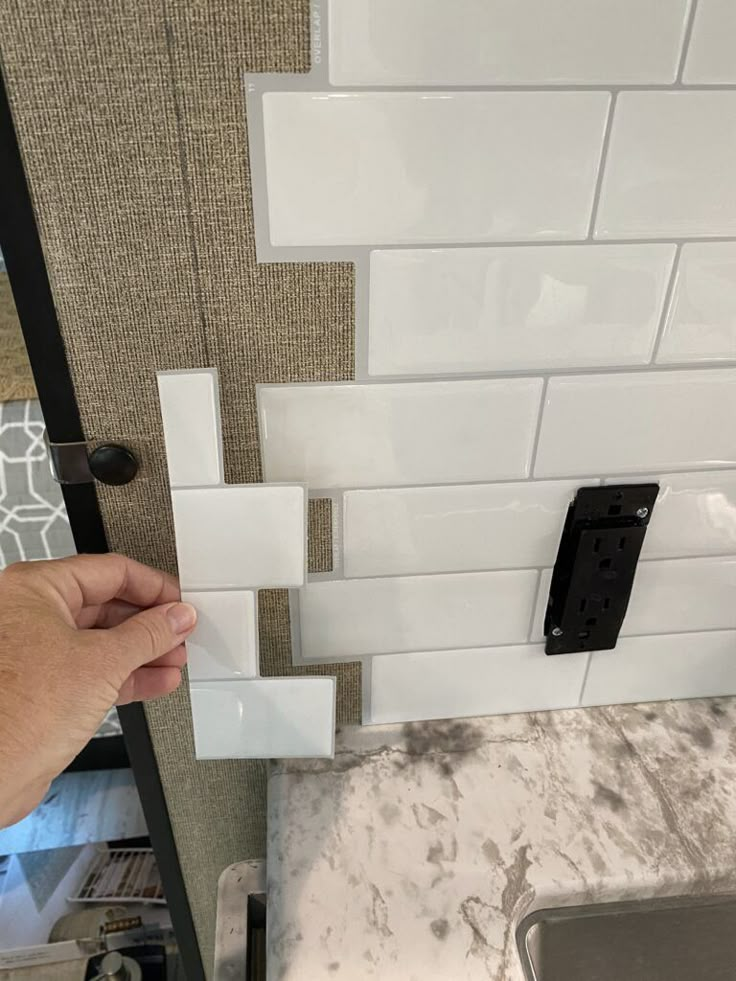
I cleaned the wall with a rag and household cleaner; I waited for it to dry. I removed all obstacles such as the window valance, the blind, the metal frame around the window, and the outlet covers. Removing the metal frame around the window and the outlet covers enabled me to ultimately hide the cut edges of the sticky tile.

Step 3: Determine Your Starting Point
I started in the corner and worked on one wall.
Step 4: Cutting and Sticking
I used the following tools:
cutting board to provide a hard surface for cutting, a metal ruler, a construction square, a utility knife to cut each piece, a square to ensure square cuts, a metal ruler as a guide for my utility knife when cutting, utility scissors to cut any odd angles such as the curves around the windows.
When cutting the first piece, I cut all the edges off to have a straight line to start in the corner. Before peeling the paper off the back, I held the sticky tile in place to ensure it would fit properly. I am not sure a camper is completely level and plumb. Then I removed the paper and stuck the tile on the wall.

I continued working horizontally down the wall to complete the first row. I used my utility scissors to cut around the outlets. When cutting around electrical outlets, I carefully pulled the outlet out of the hole (TURN THE POWER OFF WHEN WORKING AROUND OUTLETS) and installed the sticky tile behind the top and bottom outlet brackets. In other words, when the outlet is screwed back into the wall, the sticky tile will be under the brackets and held firmly in place.
Reinstalling Outlets:
After I finished installing all the sticky tiles, we replaced the brown outlets and covers with white GSI RV outlets and covers. Always TURN THE POWER OFF and/or hire a certified electrician. I am fortunate that Neal knows how to rewire outlets. Safety should always be your priority.

Slow and steady is my advice on this project!

I left the unfinished edge until all the rows were complete so I could ensure having a straight line from top to bottom.

The Second Row:
Then, I started in the corner again to begin the second row. I worked horizontally down the wall. It took me three rows to fill in the entire wall. Again, take your time and get this right.

Top Row:
I had to cut the top pieces, which was a little tricky getting this right. I cut the top of each piece close to the bottom of the cabinet but left a little extra so I was able to push the top of the sticky tile under the back of the cabinet with a putty knife; this hid the cut edge. There were a few places in which I could not wedge it under the back of the cabinet (where the cabinet was actually nailed/screwed to the wall) so I just trimmed these areas as close as I could.

Turning the corner:
Once I finished the first wall (except for finishing the edge – – more on this later), I then started again in the same corner and worked on the second wall row by row as I did on the first wall. On this wall, I had to go around the window and the hood over the stove top. You can see the valence brackets in the picture below. I did take them off but only as I was working in this section. This ensured that I could reinstall them in the same holes which gave me peace of mind when reinstalling the blind and valance. The fewer screws in a camper wall, the better!

The picture below shows the first row finished on the back wall.

Because there were so many obstacles, it was easier in a few places to fill in with scrap pieces. Notice the one tile that is missing in the picture below. I remember using scrap pieces in our previous camper and it worked great there too.
Where to end the tile:
Once all three rows were finished, I had to decide where to end the tile on the first wall. I decided to finish it directly under the cabinet. I drew a pencil line on the wall; however, I would NOT do that again. The pencil mark ended up getting on my tile and I had to carefully clean the sticky tile before installing. I cut short pieces (see picture below) to finish this wall. Take your time doing this part because the slightest difference will be seen.

I was pleased with how straight the edge of the sticky tile turned out. Relief!

Tips:
- Make sure you have the tile consistently going the same way so your joints will line up correctly. Lay this out the same way to make this easier.
- Check each section of the sticky tile to be sure it properly overlaps and your lines are consistent as you go.
- Take your time because you cannot go back and redo sections because the tile overlaps. In other words, you cannot just pull out a section of sticky tile without disrupting (and most likely ruining) the pieces around it.
- If you are working inside your house, use a level, and make a line where the top of the first row of sticky tile will go; this will serve as your guild. I did not do this because our camper was not level when I installed the sticky tile. I just used the countertop as my initial guide and that worked fine.
- The sticky tile is very sticky, so keep your work area clean so as not to get dirt, dust, etc. stuck to the back of the tile.
- Because the sticky tile is very sticky, you can gently stick it and re-stick it a few times.
- Be careful if/when you stick the tile and then remove it; if you are not careful, it will stretch and possibly rip. If you need to remove and adjust a piece, do so carefully.
- You may have some minor flaws. I do and it always bugs me but then I get perspective and remind myself that nothing in this life is perfect. We will experience perfection when we get to Heaven! ?
Here is the final result! Notice in the picture below the outlets and covers have been replaced with white ones. We are really pleased with how this turned out. Adventure awaits!

Let me know what you think or if you have any questions by commenting below. Happy DIYing!
Don’t forget to Pin this for future reference.
