How to Build a Drop Down Wall Desk

In this blog post, we will show you each step for building a drop-down wall desk: build a tabletop, add trim, cut a hole for electrical cords, install tabletop with hinges, prime, sand, paint, and polyurethane.
Background
We decided it was time to renovate my craft room. My craft room is in our loft. This space is perfect for my craft and sewing projects. I had a large desk in this room but wanted to allocate more space for a large craft table. However, I still wanted a desk that could also be used as extra counter space when working on a project. Hence, we opted to build and install a drop-down wall desk and I could not be happier with the result.
Background
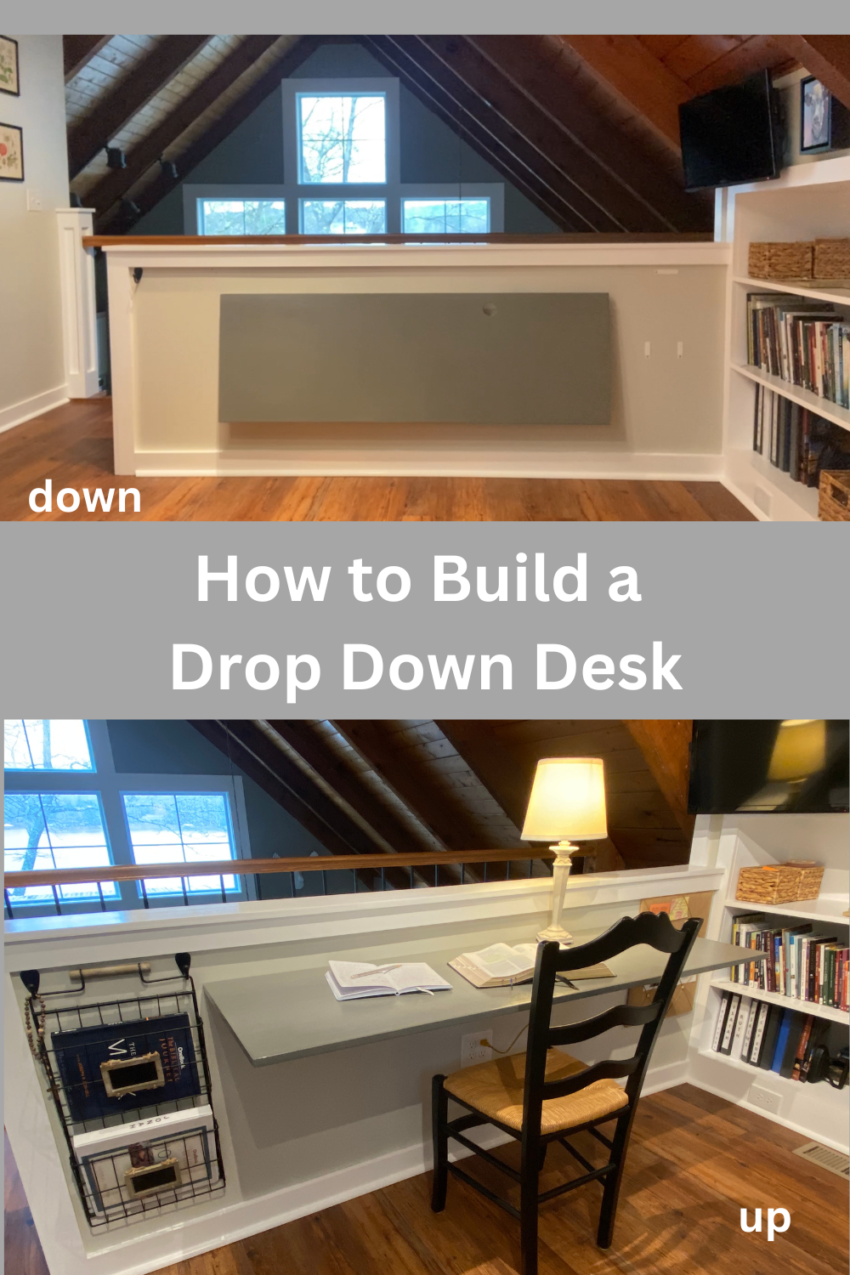
I use the loft in our home as a craft/sewing room. I had a large traditional desk in this space. We removed it and opted to install a drop down wall desk on the half wall that I could use as a desk. This ledge can be used as a desk or extra counter space. We chose to make it a drop-down desk to allow for more flexibility when large projects.
Building Tabletop
First, we used a table saw and cut cabinet-grade quarter-inch plywood 58.5″ x 18.5″.
Adding Trim
We also ripped pieces of trim (quarter-inch) to cover the plywood edges and give it extra support. Each piece of trim was cut at a 45-degree angle at each corner. We applied wood glue on each piece of trim and nailed in place using finishing nails.

Installing Hinges
We ordered these 14″ hinges from Amazon. Each bracket was installed in a stud. Neal used a level to ensure the brackets were level. Then we installed the desktop on the hinges.

Cutting a Hole for electrical cords
Neal also cut a hole in the back of the ledge so I could thread electrical cords through the hole. I wanted this hole off-centered so my lamp would be off-centered. He also added a double electrical outlet on the half wall.
Prime, Sand, Paint, and Polyurethane
We primed the ledge/desk, sanded, cleaned, painted gray, and added a coat of polyurethane.

It is very easy to raise and lower this desk ledge.
Here is my drop down wall desk.
For a more detailed blog post on how we built this drop down desk, click HERE and for a more detailed video, see below.
Don’t forget to pin this future reference.
