The ultimate guide to building a shower niche that’s both stylish and practical.
A well-designed shower niche can elevate the aesthetics of your bathroom while adding functionality and convenience to your daily routine.
In this step by step guide, we’ll walk you through everything you need to know to create a shower niche, from determining the ideal dimensions and placement, to beautiful creative tile options.
So get ready to transform your bathroom with our tips and insights for building a shower niche.
It’s week 4 of the One Room Challenge!
We’re half way through this challenge and while we’re excited to share our progress with this bathroom renovation, we have so much more to do!
Before we jump into the ins and outs of installing a shower niche, let’s take a look at the progress in our bathroom.
One of our big projects this week was to work on mudding the drywall.
Remember that we had to install a lot of new drywall in the old shower area and along the closet wall where we enlarged the bathroom by 17″.
It was slow going!
We are not experts at it and let’s say it just involves a lot of sanding, reapplying mud and more sanding.
If you have any tips to share with us, we’d love to hear from you.
After 4 days of working on the walls, I hope they’re ready for primer and paint.
So all in all it doesn’t look like a lot of progress, but getting the drywall repaired and ready for paint is a great accomplishment.
Now let’s dive into this week’s main project, building a shower niche.
Determine Shower Niche Size
Determining the size of your shower niche is an important step in the design process, as it directly impacts both the functionality and design of your bathroom space.
Start by considering the items you plan to store in the niche, such as shampoo bottles, soap, or decorative accents.
Measure the dimensions of these items to ensure that your niche can accommodate them comfortably.
In addition, take into account the overall dimensions of your shower area and the surrounding tile layout to ensure a cohesive look.
While there are no strict rules for the size of a shower niche, a common recommendation is to aim for a width of around 12 to 14 inches.
Originally I planned on purchasing a pre-fab shower niche.
While I knew they were on the expensive side, I thought it would be worth the time saved to just buy one.
There are many shower niche inserts out there, however I didn’t love the overall configuration.
And my husband wanted it to be deeper than the standard finish niche of 3 1/2″.
The wall we plan to install the shower niche on is constructed of 2×6 lumber so we could easily have a deeper niche.
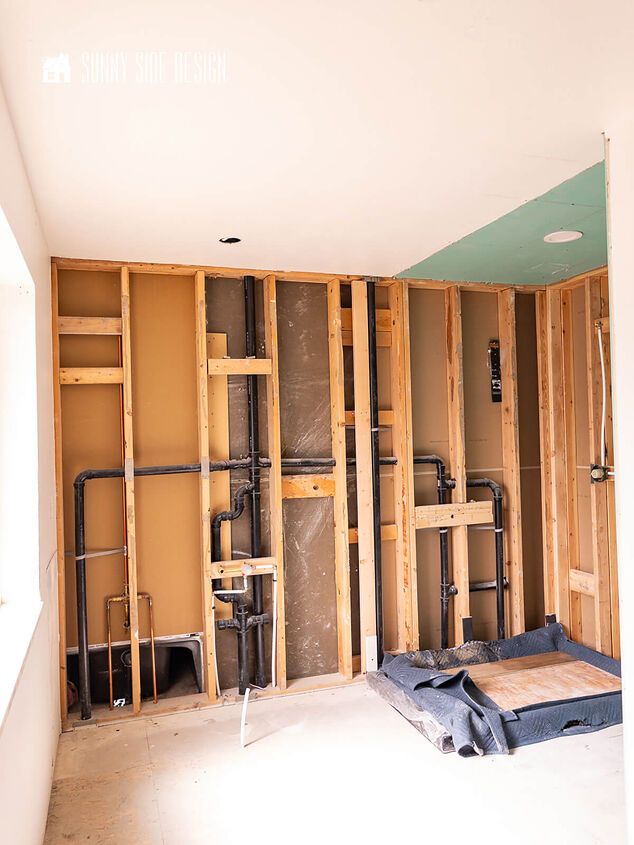
Another factor to consider is placement of your shower niche.
In a bathroom, often one wall is loaded with pipes to accommodate all of the waterlines and sewer pipes.

As you can see we’re limited on the placement of our shower niche.
Another factor to consider is how your tiles will be placed around your niche area.
With using large format tiles on the wall, we want to ensure that the tiles will be evenly spaced around the niche.
The overall dimensions of our finished shower niche will be 27″x16.5″x5″.
Large enough to accommodate all of our needs.
Supplies and Tools
Luckily we had most of the supplies we needed to build a shower niche.
We had enough leftover 1/4″ cement backer board left over from tiling my laundry room floor
You’ll need the following supplies and tools:
Materials:
- 1/4″ cement backer board
- backer board screws
- green joint tape
- construction adhesive
- Redgard or Aqua Defense
Tools:
- level
- oscillating cut tool
- nail gun or pocket hole jig and drill
Sunny Side Design is a participant in the Amazon Services LLC Associates Program, an affiliate advertising program designed to provide a means for sites to earn advertising fees by advertising and linking to Amazon.com. As an Amazon Associate, this blog earns from qualifying purchases with no additional cost to you. Click here to read our full disclosure policy.
Are you enjoying this post?! Please Pin It, save it for later and share it with a friend.
Sharing is caring!
Frame Shower Niche
Most pre-fab shower niches are designed to be placed between the studs in your wall, but in our case we decided make it wider.

First we cut out the 2×6 stud in the center of our niche area with plunge blade in the oscillating cut tool.

Next we cut 2 2×6 boards for the bottom and top of our shower niche.
Make sure they are level,

and that the bottom board slopes forward with a slight angle.
This will ensure that water doesn’t pool on the shelf in your shower niche.

Once everything is level, secure the bottom and top boards in place by toenailing into the side studs.
Another way you can secure the 2 boards would be with a pocket hole jig and screws.

Once the top and bottom boards are secured it will look something like this.

Finally to complete the framing, we cut a piece of plywood and attached it to the drywall in the back with construction adhesive.
Welcome to Our Site
If you’re new here, welcome! We’re so glad you’re here.
Let us introduce ourselves, we’re Michelle and Steph, a mom and daughter team who love to DIY and decorate our homes.
Not only are we passionate about making our homes warm, comfortable and unique, but it’s our mission to help you create that same feeling in your own home.
You’ll find ideas for repurposing, creating, decorating and making your home truly yours, while always mindful of a tight budget.
Undoubtedly we love finding ways to make your home look high-end on a small budget.
Plus you’ll also find a recipe or two as we share our family favorites with you.
We’d love it if you’d join our community of doers so you won’t miss any inspiration for your home.
We love new friends.
Install Cement Backer Board or Greenboard
To prepare your niche for tile you’ll need to install tile backer board or greenboard.
In my main bathroom and Steph’s basement bathroom we used greenboard or moisture resistant drywall as the base for our tub surrounds, but this time we are using cement tile backer board.

For the shower niche we used 1/4″ cement tile backer board and 1/2″ cement backer board for the walls.
It’s necessary to use the 1/2″ backer board if the wall will join to drywall.
The 1/4″ backer board is secured to the back of the niche with construction adhesive.
While usually you secure the backer board with rock-on screws, we were concerned that they were too long and may go through the drywall in the adjoining bathroom.

The 1/2″ cement backer board needs to be secured to the shower walls before the remaining 1/4″ backer board is attached to the top, bottom and sides of the shower niche.
These pieces are secured with the rock-on screws.
Tape and Mortar Joints
To prepare the backer board for the waterproofing membrane, all of the joints will need a mold and mildew resistant joint tape web applied.

This web is tacky and is applied directly over every seam on the backer board.

Then mortar is spread over the web.
I found that the web didn’t adhere well to the corners and I had to press it down as I covered it with the mortar.

Spread the mortar out smooth, blending it into the cement backer board.
Let’s stay connected! Follow us on social media!
Add Waterproofing Membrane
Once the mortar is completely dry, it’s ready for the waterproofing membrane.

I used Redgard to waterproof my shower, or another option is Aqua Defense by Mapei.
You simply brush or roll it on to the entire area, niche and shower walls.
The Redgard goes on pink and turned red when it’s dry.
You’ll want to apply 2 coats to fully waterproof your shower.
Tile Shower Niche
Now it’s time for the fun part!
Adding the beautiful tile that will make your shower uniquely you.
Because of the small area of a shower niche you can afford to buy the more expensive and pretty tiles here.
I chose a black and white basketweave marble tile for my shower niche.
And even with the large size of my nice it only took 4 tile sheets.
It’s a great area to add a fun design element.
In Steph’s coastal bathroom she added a beautiful blue glass fish scale tile.
It was pricey, but she only needed a few tiles and it makes a big impact.
Cut Tile

For years we’ve been using a small inexpensive tile saw for our projects and it’s worked well for may years.
But as we were about to replace the blade, a weld broke and we decided to upgraded and get a new tile saw.
I felt like we have died and gone to tile saw heaven.
It has a laser guide to ensure the cuts are strait, a sliding tray to glide the tile through the blade and best of all it has a splash guard!
No more getting soaked and covered in mucky wet tile gunk.
Just take a look at Steph’s husband after cutting the bricks for the wet bar.

He was such a trooper!
We cut all of our tiles for the shower niche in advance and did a dry fit before installing them.
Install Shower Niche Tile

You’ll begin by tiling the back wall of the shower niche.
Trowel on mortar or mastic with a 1/4″ notch trowel.

Then press the first tile into position.

Then to ensure that each tile on the mesh is secured to the mortar, take a grout float and gently push the tiles.
Repeat until all of the tiles are attached to the back wall.

At this time cut the tiles for the sill, top and sides of the shower niche.
To complete our shower niche, we are using that same tile that we’re using on the remainder of the shower walls.
Install them in this order:
- adhere the sill.
- adhere the top tile.
- adhere the left and right side tiles.
Niche Edge Finishes
The edge of your shower niche can be finished in a couple of different ways.
You can use a bullnose tile around the perimeter in the niche.
That’s the method I used in the niche on my tub surround.
Another way is to use a liner tile to frame it out.
Or you can use a Schluter trim.
That’s the method we used for Steph’s niche in her basement bathroom.
Our plan is to use a Schluter trim and we’ll install that when we install the shower walls next week.

Here’s the finished shower nice with the metal trim.
If you’ve never installed a metal trim before, take a look at our tips for installing a Schluter trim.
Shop Beautiful Accent Tiles
Clearly adding a beautiful accent tile elevates the look and feel of your bathroom.
Often accent tiles can get pricey, but usually you just need a few tiles for your shower niche, so it’s the perfect place to add a little fun design.
Just take a look at these gorgeous tile options.
FAQ
What is the best depth for a shower niche?
Generally, a depth of around 3 1/2″ is considered ideal for accommodating standard shower products like shampoo bottles and soap.
However, if you have larger bottles or specific items you wish to store, you may opt for a deeper niche.
It’s essential to strike a balance between functionality and aesthetics, ensuring that the niche is deep enough to hold your essentials while maintaining a sleek and integrated look within your shower design.
What is the best size for a shower niche?
The best size for a shower niche really depends your personal preferences and the items you plan to store within the niche.
However, a common recommendation is to aim for a width of around 12 to 14 inches and a height that complements the surrounding tilework.
This size typically accommodates standard shower products like shampoo bottles and soap while maintaining a sleek and integrated look within your shower design.
Ultimately, the best size for your shower niche is one that meets your storage needs while creating an overall pleasing look in your bathroom.
Where is the best place to put a shower niche?
The best place to put a shower niche is often on the long wall of the shower.
This placement provides easy access to shower products while showering and creates a focal point in the shower space.
Also, consider positioning the niche at a comfortable height for convenient reach, typically around chest to shoulder level.
However, the specific placement may vary depending on your bathroom layout and personal preferences.
Should a shower niche be slanted?
Incorporating a slight slope or slant to the lower shelf of a shower niche can help facilitate water drainage and prevent pooling.
This slope encourages water to flow towards the shower floor, reducing the risk of water accumulating in the niche.
How do you waterproof a shower niche?
First you’ll want to apply a mold resistant joint tape on all seams and corners.
Then top these joints with a layer of mortar, smoothing it into the cement backer board.
Finally brush or roll 2 coats of a liquid waterproofing membrane over the entire surface of the niche and adjoining walls.
What order do you tile a niche?
- Start by tiling the back wall of the shower niche.
- Next tile the sill.
- If your shower niche includes a shelf, install the two side tiles and then the shelf.
- Install the tile on the top of the shower niche.
- Followed by the two side tiles.
Should I use accent tile in shower niche?
Using accent tile in a shower niche can be a fantastic way to add visual interest and personality to your bathroom design.
Accent tiles can create a focal point within the shower space, drawing attention to the niche and making it a standout feature.
Whether you opt for a contrasting color, pattern, texture, or shape, accent tiles can add depth and dimension to the overall design, elevating the aesthetic appeal of your shower.
Is it better to use Schluter or bullnose?
Both Schluter strips and bullnose tiles serve as a great edge treatment for finishing off the edges of tiled surfaces, including shower niches.
The choice between Schluter and bullnose ultimately depends on personal preference, design choices of your specific project.
Schluter trim pieces, offer a modern and sleek finish to tiled edges.
They come in various colors and materials, including aluminum, stainless steel, and PVC, and provide a clean and contemporary look.
On the other hand, bullnose tiles feature a rounded edge that provides a softer and more traditional finish to tiled edges.
However, you may find it difficult to find a bullnose tile in your specific tile pattern, then you may need to choose a Schluter trim.
Are shower niches hard to keep clean?
Shower niches can be relatively easy to keep clean.
Regular cleaning with mild soap and water or a non-abrasive tile cleaner can help remove soap scum, mineral deposits, and dirt from the surface of the tiles.
It’s essential to wipe down the shower niche regularly and ensure that it’s adequately ventilated to allow for proper drying.
In addition, using a squeegee to remove excess water from the tiles after showering can help prevent water spots and mineral deposits from forming.
Are shower niches worth it?
Yes, shower niches can be worth it, as they offer several benefits that enhance both the functionality and overall feel of your bathroom:
- Storage Convenience: Shower niches provide a convenient and accessible storage solution for shower essentials such as shampoo bottles, soap, and razors. By keeping these items within arm’s reach, shower niches help declutter the shower area and streamline your daily routine.
- Optimize Space: Shower niches are built directly into the shower wall, maximizing the use of available space.
- Aesthetic Appeal: A well-designed shower niche can add visual interest and style to your shower, serving as a focal point or decorative element in the bathroom.
- Easy Maintenance: Tiled shower niches are relatively easy to clean and maintain, requiring regular wiping down to remove soap scum and dirt. Also, since shower niches are typically waterproofed, they are resistant to mold and mildew growth.
- Customization Options: Shower niches can be customized to fit your specific needs.
Overall, shower niches can be a worthwhile investment to optimize your space, enhance storage, and elevate the overall style of your bathroom.
Final Thoughts
While initially I didn’t want to frame out my own shower niche, I’m so happy we did.
We were able to make it larger and use the extra depth that was in our walls.
The actual framing of the shower niche was pretty quick, it probably took less than an hour and saved me at least $100.
And with this big of a renovation, every penny I can save counts!
Is this a feature you’d like to add to a bathroom in your home?
Is this a project you feel confident to try?!
Now let’s take a look at our bathroom reno to do list.
Bathroom Remodel To Do List
- demo bathroom
- move closet wall
- rough in plumbing and electrical
- change swing of door
- repair walls and ceiling
- install shiplap ceiling, paint
- paint doors
- install shower pan
- paint walls
- install vanity
- prime and paint baseboards
- install cement backer board
- install shower niche
- waterproof shower
- tiling & grout
- install waterproof luxury vinyl plank floors
- install soaker tub
- install plumbing fixtures
- install toilet
- shower enclosure
- recessed shelves
- install lighting
- mirrors
- curtains
- towel hooks
- art and decor