Skip to content

Find Your Dream Home

Million Ideas

Menu
  • Home
  • HOME IMPROVEMENT
    • BATHROOMS
    • BEDROOM
    • LIVING ROOM
    • LAUNDRY ROOM
    • KID’S ROOM
    • WORK SPACE
    • DINING ROOM
  • DECORATING & DIY IDEAS
    • GARDEN IDEAS
    • SWIMMING POOL
    • OUTDOOR
    • LANDSCAPING
  • CLEANING & ORGANIZATION HACKS
  • Tips Idea
  • Sewing and Craft
  • MAXI & COLORFUL
  • RECIPES
    • BREAKFAST
    • DINNER
    • LUNCH
    • DESSERT
  • Contact Us
  • Privacy Policy
    • Copyright
    • Terms of Service
Menu

Quick and Easy From Carpet Stairs to Wood – DIY Hack

Posted on April 7, 2025

From Carpet to Wood Stairs Redo – Cheater Version…

6 Materials
$500
5 Days
Medium

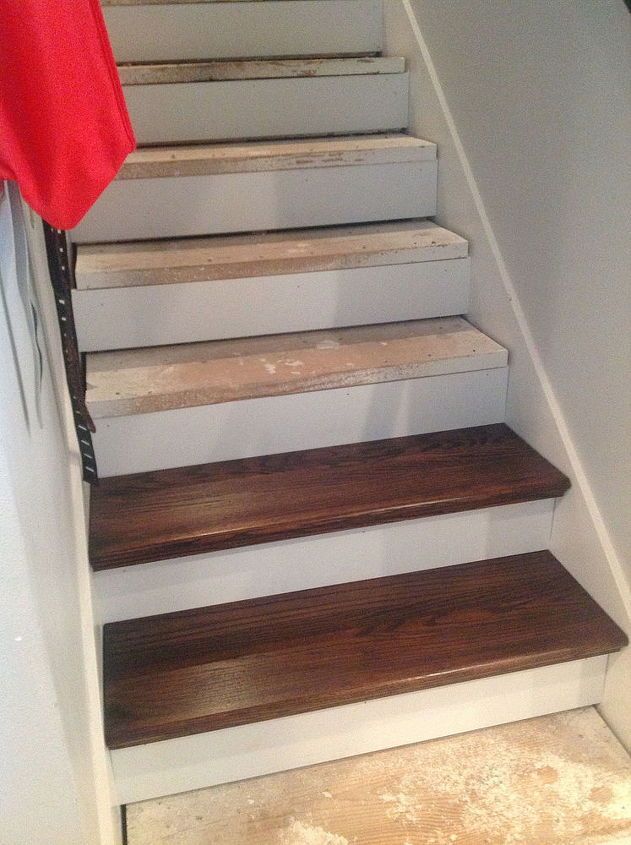
You know all of those stair tutorials that are a lot of work. Lots of scraping and lots of painting. Well, this is a cheater version (little scraping / little painting) that uses wood caps on top off your existing stairs. They are called Retro Treads and mine were unstained red oak from Lowes. Check out my step-by-step tutorial so that you can redo your own stairs with minimal work and maximum effect!

from carpet to wood stairs redo cheater version, DIY Wood Stairs
DIY Wood Stairs

Tools and Materials

  • Duraseal quick coat 2 hour antique brown stain
  • Retrofit tread kit with riser
  • Floor adhesive
  • Floor adhesive caulking gun
  • Finishing nails
  • Finishing nailer
from carpet to wood stairs redo cheater version, Wood Stair Treads
Wood Stair Treads

These required very little effort. If it weren’t for the landing, I would have been finished in a weekend.

Retro Treads can be found on the internet. Mine were unstained and I stained them a very dark color. I put three coats of stain on each tread two hours apart for curing.

from carpet to wood stairs redo cheater version, Remove the Carpet
Remove the Carpet
Remove the CarpetFirst , I removed all the carpet. That was the hardest part of the project. There were a million staples. I would peel out a corner and then yank. Then, I came back with a heavy duty pliers and pulled out all the staples. I scraped the stairs a little and vacuumed them. I didn’t really spend a lot of time on them unless there was a chunk of spackle that would make a bump. A stair cap covers them completely, no worries about how awful they look. Also, the floor adhesive was pretty thick and I applied a generous amount so that also allowed for some forgiveness here.

from carpet to wood stairs redo cheater version, Add Risers
Add Risers
Add RisersI bought prepainted white mdf boards and cut them down for risers. It came out to around $40. My Retro Tread Caps were $23 a piece. They are really long and I cut about 12 inches off each. I do have a landing and I used one Retro Tread and added enough red oak boards behind it to cover the landing. I put them all together with wood glue and clamped them securely. Then, I installed it as one large piece. In hindsight, that one large piece was heavy and hard to handle by myself, so maybe find someone to help out for this step.

from carpet to wood stairs redo cheater version, Adhere Caps to Steps
Adhere Caps to Steps
Adhere the Caps to the StepsTo adhere the caps to the steps, I used heavy duty flooring adhesive in a giant caulk gun and a nail gun to secure them. First, I put on all the risers, DO NOT DO THIS. It works much better to put on the cap and then the riser sits on the back of the step and helps hold it in place. So in the picture above, all those risers were ripped out, and mdf breaks when pried. It wasn’t a pretty picture… I do believe I had to buy more… sigh…

from carpet to wood stairs redo cheater version, Stain
Stain
StainThis was the stain that I used and I love how it came out. I only used part of this can. A little bit went a long way. Every single time I walk up them, I love them. We were talking of moving and my oldest son said, “What! After you made the mudroom and redid the stairs! Are you kidding?” Well, I am sure there will be projects in the next house as well. 🙂

from carpet to wood stairs redo cheater version, The Finished Product
The Finished Product

Here is a picture of the landing. It consists of a Retrotread and then I glued assorted sizes of red oak boards to the far side of it. I was worried that the boards might stain differently than the Retroread but it was a perfect match.

*** UPDATE *** I get a lot of questions on if my wood steps are slippery and if we have trouble with people falling on them. I really think this involves many factors that are individual to your situation. We lived in Florida at the time I put these steps in our house. Since it is almost always hot there, we didn’t have a lot of sock-footed traffic on the stairs. I think that socks on stairs can be dangerous, either wood or carpet. Another factor for us, was the fact that only one bedroom was up these stairs. Pretty much only the teenager that was living up there, traveled up those stairs regularly and myself to clean. In addition, to these factors, my kids were older. All of them teenagers. Now in regard to the stairs themselves, I didn’t spend a lot of time sanding these treads. I made sure they wouldn’t have any super rough spots but I didn’t spend hours sanding them ultra smooth. And those glossy super shiny wood floors you see? These stairs are beautiful but the poly that I planned to add, I never did. So maybe a super shiny poly would have made a difference. ***

from carpet to wood stairs redo cheater version, Carpeted Stairs
Carpeted Stairs

In my current house, the wood stairs lead to a carpeted hallway. I like how the previous homeowners transitioned this area. I thought others could use this idea as inspiration.

Post Views: 99
June 2025
M T W T F S S
 1
2345678
9101112131415
16171819202122
23242526272829
30  
« May    
  • Transform your dead grass into a circular brick masterpiece
  • What Color to Paint These Bricks
  • Let’s find the perfect color to complement your new bedding
  • Let’s dive into some ideas for transforming your front yard
  • Here are some ideas for different styles and functionalities of coffee tables
©2025 Find Your Dream Home | Design: Newspaperly WordPress Theme