Something as simple as new window trim can make a room just POP. I trimmed out my window in my kitchen and sunroom and it immediately made the rooms look ten times better. I love the look of this farmhouse style trim and how budget friendly and simple it was to do by yourself!

Here’s the window before in the midst of my kitchen reno…
First step is to start with a blank canvas. Remove any old trim around your window by scoring the caulk lines with a utility knife and use a pry bar and hammer to pry the trim away. Next measure the width and height of your window frame. Then you’re going to want to head to your local hardware store and pick up these supplies….
Materials needed:
- 1×6 board
- 1×4 board
- 1×2 board
- Miter saw (chop or table saw will also work)
- Brad nail gun
- 2in Brad nails
- Liquid nails
- Orbital sander and 120 grit sand paper
- Wood filler
- Caulk and caulk gun

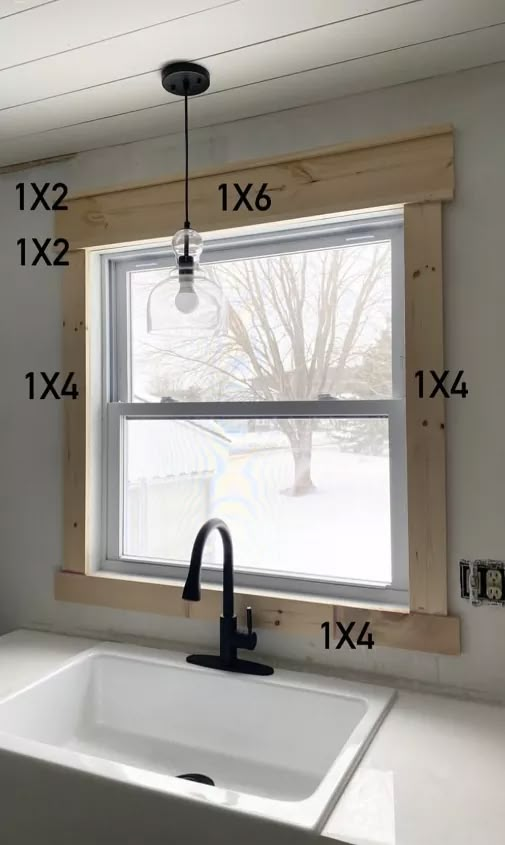
Here is a quick visual of where each size board is going to go around your window. Then I will go in to detail, step by step, on how to measure and put up each board.
Depending on the size of your window will determine how much wood you will need. My window was relatively small but this will all just depend on what you’re working with!
Now time to make your cuts. Start with the left and right side of your window. These will be 1x4s. Using the height measurement of your window cut 2 – 1x4s to the height of your window.

Sand the board down to ensure it is smooth. Then, apply a small amount of liquid nails to the back of the board and secure it to the wall using your nail gun and 2in brad nails. A hammer and nails will work also, but will be more work and you will see the nail head. I prefer my nail gun because you can fill that hole with wood filler and never even notice the hole in the end. But totally up to you and your preference!
Next you will need a 1×2 trimmed down to the width of your window plus an additional 10in for overhang. That 10in accounts for the width of your 1×4, which is only 3.5in (I know it makes no sense that it’s called a 1×4 and its really 3.5in) times 2. Plus, 1.5in will overhang from each side. Repeat the same process of sanding it down, then applying liquid nails, and securing it in place with your nail gun. This piece will be the first layer to the top of your window. Lay this piece just like shown below, making sure the overhang on each side is equal, 1.5in on each side. I nailed the board into my wall and also into the side trim pieces.

Then you will trim your 1×6 also to the width of your window plus an additional 10in. Follow the same steps as listed above to secure the board to the wall. The 1×6 should line up equally to the 1×2 underneath it.

The last part of the top of the window is another 1×2. Trim that piece again to the width of your window plus an additional 10in as well. Lay the 1×2 on top of the 1×6 and secure into place using the same above mentioned steps.

The last piece is the bottom trim piece! You will use a 1×4 for this. You will cut this again to the width of your window plus an additional 10in. Sand and secure the piece into place! Making sure that it lines up center on your window with 1.5in overhang on each side.

To finish, you want to fill all of your holes and gaps with wood filler, sand, and caulk the seams. Then you are ready to paint! It took me forever to decide on a paint color. While I contemplated on the color choice I did a brick accent wall pictured below.

Then I went ahead a painted the window trim alabaster white! Check out the after below!

I loved this trim so much that I decided to also do the DIY farmhouse window trim to my sunroom window. I painted The sunroom window in the color calico cream, pictured below. I love how both of the windows turned out so much!!

I used the same exact steps to trim out this window in my sunroom except I added a window ledge. I screwed the window ledge into the studs of the window first then follow the same steps as listed above. The window ledge is 1×6 cut to the length of my window plus an additional 10in to account for the overhang.